2010/10/10


以前まではreadonlyなAPIでしたが、先日見たら更新出来る様になってた。
Google Buzz API - Google Code

Share Buzz updates New!

Full read/write support with:
  • Activity Streams
  • AtomPub
  • OAuth
  • PubSubHubbub
  • JSON

http://code.google.com/intl/ja/apis/buzz/
これはいかん!とばかりにvimscriptから更新してみた。

今回の対応で、vim-oauth(現在webapi-vimに取り込まれました)に幾らか修正をしました。
mattn's webapi-vim at master - GitHub

webapi-vim: vim interface to Web API

http://github.com/mattn/webapi-vim
以下、使用したスクリプト。
set rtp+=webapi-vim

let request_token_url = "https://www.google.com/accounts/OAuthGetRequestToken"
let access_token_url = "https://www.google.com/accounts/OAuthGetAccessToken"
let auth_url = "https://www.google.com/buzz/api/auth/OAuthAuthorizeToken"
let post_url = "https://www.googleapis.com/buzz/v1/activities/@me/@self"

let consumer_key = $CONSUMER_KEY
let consumer_secret = $CONSUMER_SECRET
let domain = $CONSUMER_DOMAIN
let callback = $CONSUMER_CALLBACK

let [request_token, request_token_secret] = oauth#requestToken(request_token_url, consumer_key, consumer_secret, {"scope": "https://www.googleapis.com/auth/buzz", "oauth_callback": callback})
if has("win32") || has("win64")
  exe "!start rundll32 url.dll,FileProtocolHandler ".auth_url."?oauth_token=".request_token."&domain=".domain."&scope=https://www.googleapis.com/auth/buzz"
else
  call system("xdg-open '".auth_url."?oauth_token=".request_token."'")
endif
let verifier = input("PIN:")
let [access_token, access_token_secret] = oauth#accessToken(access_token_url, consumer_key, consumer_secret, request_token, request_token_secret, {"oauth_verifier": verifier})
echo access_token
echo access_token_secret
let data = ''
\.'<entry xmlns:activity="http://activitystrea.ms/spec/1.0/"'
\.' xmlns:poco="http://portablecontacts.net/ns/1.0"'
\.' xmlns:georss="http://www.georss.org/georss"'
\.' xmlns:buzz="http://schemas.google.com/buzz/2010">'
\.'  <activity:object>'
\.'    <activity:object-type>http://activitystrea.ms/schema/1.0/note</activity:object-type>'
\.'    <content>Bzz! Bzz!</content>'
\.'  </activity:object>'
\.'</entry>'
let ret = oauth#post(post_url, consumer_key, consumer_secret, access_token, access_token_secret, {}, data, {"Content-Type": "application/atom+xml", "GData-Version": "2.0"})
echo ret
Atom APIなのでXMLでポストします。なお、今回GoogleのOAuthを使ったのですが、GoogleのOAuthってドメイン持ってないと使えないんですね。
私はここのサイトを使いましたが、Google App EngineでもOKです。

まずココでドメインを登録します。実はこのドメイン名がconsumer_keyとなります。ドメインを登録するとconsumer_secretが貰えます。
またコールバック先のURLが必要になります。通常登録したドメイン上でもよいのですが、別のサイトでも構わない様です。さらにGoogle OAuthではリクエストトークンを取得する際、およびベリファイアを貰う際にscopeパラメータが必要です。個々のGoogleサービスによって異なりますので、ココの一覧を参照して設定して下さい。なお、Google Buzzについてはリストアップされていませんが、色々探して見つけました。
さて次にアクセストークンを取得するのですが、ここで気をつけないとハマる問題がありあます。
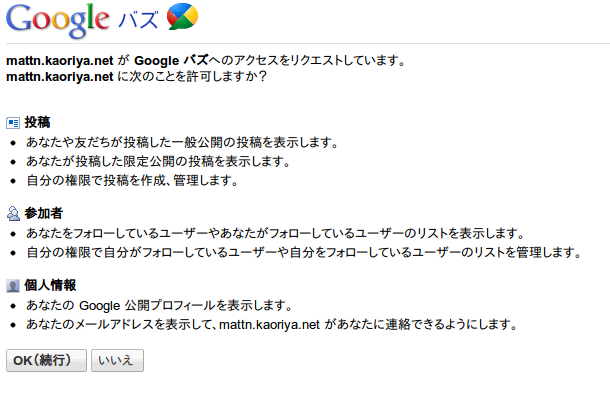
Authentication in the Google Data Protocol - Google Data Protocol - Google Code

https://www.google.com/accounts/OAuthAuthorizeToken, referencing the request token and including the oauth_callback parameter. Google may prompt the user to log into their Google Account. Once authenticated with Google, the user chooses to share their data.

http://code.google.com/intl/ja/apis/gdata/docs/auth/overview.html
Googleのドキュメント通りでは成功しません。実は、このアクセストークン要求先は各サービスによって異なります。ここにアクセスしてもアクセストークン、アクセストークンシークレットは貰えるのですが、これを使ってアクセスしても401が返ります。Google Buzzであれば実際はGoogle Buzz専用の「https://www.google.com/buzz/api/auth/OAuthAuthorizeToken」にアクセスしなければなりません。こちらにはBuzzに対する許可設定画面も出てきます。
google-buzz-api1
ここまでくればあとはAtomでXMLを送ればちゃんとBuzzってくれます。
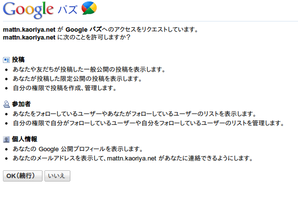
ちなみにココが証拠ポスト。

追記
ちなみに日本語もOKでした。
Posted at by


2010/09/16


サイボウズLiveにAPIが追加されましたね。
機能追加のお知らせ(API公開、Googleカレンダーとの同期、デザイン変更) | サイボウズLiveマガジン
9月15日のサイトメンテナンスにより、新機能を追加しました。
■APIの公開
外部アプリケーションからサイボウズLiveの情報を取得・操作できるAPIを公開しました。通信方式はREST、認証方式はOAuthです。現在は最新情報の取得、スケジュール情報の取得に限定していますが、順次APIで取得・操作可能な情報を拡充していきます。
APIの公開にあわせて、サイボウズLive Developer Centerを公開しました。
http://magazine.cybozulive.com/2010/09/system_update10.html
API好きとしては、これを放っておく訳にはいきません。
もちろんVimで行きます!

APIはドキュメントによるとAtomを使います。また認証にはTwitterと同じくOAuthが採用されています。
Vimscriptでやるには少し敷居が高いんじゃないの?と思っている貴方!出来るんです!やるんです!

まず先日作った、vim-oauthを使って認証を行いました。
"https://api.cybozulive.com/oauth/initiate" に対してリクエストトークンを要求し、そのリクエストトークンを元に "https://api.cybozulive.com/oauth/authorize" でブラウザ認証を行います。すると数文字のベリファイアが貰えるので、"https://api.cybozulive.com/oauth/token" へアクセストークンを要求します。
これで認証必要な物は揃いました。ここまでをコードにすると以下の様な感じ。
set rtp+=webapi-vim

let config = {}
let configfile = expand('~/.cybozulive')
if filereadable(configfile)
  let config = eval(join(readfile(configfile)""))
else
  let config.consumer_key = input("consumer_key:")
  let config.consumer_secret = input("consumer_secret:")
  
  let request_token_url = "https://api.cybozulive.com/oauth/initiate"
  let auth_url =  "https://api.cybozulive.com/oauth/authorize"
  let access_token_url = "https://api.cybozulive.com/oauth/token"
  
  let [request_token, request_token_secret] = oauth#requestToken(request_token_url, config.consumer_key, config.consumer_secret)
  if has("win32") || has("win64")
    exe "!start rundll32 url.dll,FileProtocolHandler ".auth_url."?oauth_token=".request_token
  else
    call system("xdg-open '".auth_url."?oauth_token=".request_token."'")
  endif
  let verifier = input("PIN:")
  let [access_token, access_token_secret] = oauth#accessToken(access_token_url, config.consumer_key, config.consumer_secret, request_token, request_token_secret, {"oauth_verifier": verifier})
  let config.access_token = access_token
  let config.access_token_secret = access_token_secret
  call writefile([string(config)], configfile)
endif
これで、アクセストークンとアクセストークンシークレットが貰えます。簡単ですね!
さて、肝心のAtomです。このブログでは紹介した事なかったと思いますが、VimでのXMLパーサを実は以前書いた暖めておりました。
mattn's xmlparser-vim at master - GitHub

XML Parser for Vim

http://github.com/mattn/xmlparser-vim
これを使ってパースしました。パースするとDOMが返ります。
let notification_url = "https://api.cybozulive.com/api/notification/V2"
let ret = oauth#get(notification_url, config.consumer_key, config.consumer_secret, config.access_token, config.access_token_secret, {})
let dom = xml#parse(ret.content)
for elem in dom.findAll("entry")
  echo elem.find("updated").value() . " " .  elem.find("title").value()
  echo "  " . elem.find("author").find("name").value()
  let summary = elem.find("summary")
  if !empty(summary)
    echo "  " . substitute(summary.value(), "\n""\n  ""g")
  endif
  echo "\n"
endfor
こんな感じにXMLを処理出来ます。これ、全てPure Vimscriptです。信じれない人や変態な人は、ソース覗いて下さい。
動く物を置いておきます。
mattn's cybozulive-vim at master - GitHub

vim interface to cybozulive

http://github.com/mattn/cybozulive-vim
http 関連、XML関連を纏めて webapi-vim というリポジトリに入れ、cybozulive-vim からは submodule としています。
mattn's webapi-vim at master - GitHub

vim interface to Web API

http://github.com/mattn/webapi-vim
# git submodule init
# git submodule update
として下さい。
以下、cybozulive.vim の全体のソースです。 set rtp+=webapi-vim

let config = {}
let configfile = expand('~/.cybozulive')
if filereadable(configfile)
  let config = eval(join(readfile(configfile)""))
else
  let config.consumer_key = input("consumer_key:")
  let config.consumer_secret = input("consumer_secret:")
  
  let request_token_url = "https://api.cybozulive.com/oauth/initiate"
  let auth_url =  "https://api.cybozulive.com/oauth/authorize"
  let access_token_url = "https://api.cybozulive.com/oauth/token"
  
  let [request_token, request_token_secret] = oauth#requestToken(request_token_url, config.consumer_key, config.consumer_secret)
  if has("win32") || has("win64")
    exe "!start rundll32 url.dll,FileProtocolHandler ".auth_url."?oauth_token=".request_token
  else
    call system("xdg-open '".auth_url."?oauth_token=".request_token."'")
  endif
  let verifier = input("PIN:")
  let [access_token, access_token_secret] = oauth#accessToken(access_token_url, config.consumer_key, config.consumer_secret, request_token, request_token_secret, {"oauth_verifier": verifier})
  let config.access_token = access_token
  let config.access_token_secret = access_token_secret
  call writefile([string(config)], configfile)
endif

let notification_url = "https://api.cybozulive.com/api/notification/V2"
let ret = oauth#get(notification_url, config.consumer_key, config.consumer_secret, config.access_token, config.access_token_secret, {})
let dom = xml#parse(ret.content)
for elem in dom.findAll("entry")
  echo elem.find("updated").value() . " " .  elem.find("title").value()
  echo "  " . elem.find("author").find("name").value()
  let summary = elem.find("summary")
  if !empty(summary)
    echo "  " . substitute(summary.value(), "\n""\n  ""g")
  endif
  echo "\n"
endfor
実行結果貼っておきますね。 2010-09-16T03:33:00Z サイボウズLiveアプリを作る!
  松本 泰弘
  [登録] 2010年9月16日(木)

2010-06-30T14:42:20Z tw.pptx
  竹迫 良範

2010-09-15T02:40:58Z mattnさんとオフする
  松本 泰弘
  大阪に出張に逝ったときとか

2010-06-18T01:27:21Z 竹迫 良範 さんが参加しました
  竹迫 良範

2010-02-26T03:59:58Z test
  hasegawa yosuke
  EF BB BF C0 AF 2F
  (添付ファイルがあります。)

mattn the pure vimscripter.
Posted at by


2010/09/11


先日emacsからtwitter出来る、twittering-modeというのを試してみたんですが、ちゃんとOAuth出来てて便利でした。lispでも色々出来るなーと感心しました。
EmacsWiki: Twittering Mode

twittering-mode.el is a Twitter client

http://www.emacswiki.org/emacs/TwitteringMode
それと同時に、いつもの妖精が耳元でささやいた。
「vimスクリプトでもきっと書けるさ」
で、書きました。
mattn's vim-oauth at master - GitHub

oauth access library for vim

http://github.com/mattn/vim-oauth
sha1, hmac, base64 の処理には、Nakadairaさんの物を使わせて頂きました。
vimでtwitter出来るvimscriptとしてtwitvimがありますが、こちらはOAuthな処理をpython/perl/ruby拡張でやってます(どれか有効な奴を使う)。
vim-oauthがあれば、pure vimscriptでOAuth対応のtwitterが可能です。添付のtwitter.vimのCONSUMER_KEYとCONSUMER_SECRETを書き換えてご試して下さい。最終引数はディクショナリにしてあるので、自分でパラメータを変えればxAuthにも対応可能かと思います。
ちなみにtwitvim、nr2charの使い方が間違ってるのでwindowsで実行すると文字化けしてました。patchを書いて作者と連絡中です。
Posted at by