Google Buzz API - Google Codeこれはいかん!とばかりにvimscriptから更新してみた。
http://code.google.com/intl/ja/apis/buzz/Share Buzz updates New!
Full read/write support with:
- Activity Streams
- AtomPub
- OAuth
- PubSubHubbub
- JSON
今回の対応で、vim-oauth(現在webapi-vimに取り込まれました)に幾らか修正をしました。
mattn's webapi-vim at master - GitHub以下、使用したスクリプト。
webapi-vim: vim interface to Web API
http://github.com/mattn/webapi-vim
set rtp+=webapi-vim


let request_token_url = "https://www.google.com/accounts/OAuthGetRequestToken"

let access_token_url = "https://www.google.com/accounts/OAuthGetAccessToken"

let auth_url = "https://www.google.com/buzz/api/auth/OAuthAuthorizeToken"

let post_url = "https://www.googleapis.com/buzz/v1/activities/@me/@self"


let consumer_key = $CONSUMER_KEY

let consumer_secret = $CONSUMER_SECRET

let domain = $CONSUMER_DOMAIN

let callback = $CONSUMER_CALLBACK


let [request_token, request_token_secret] = oauth#requestToken(request_token_url, consumer_key, consumer_secret, {"scope": "https://www.googleapis.com/auth/buzz", "oauth_callback": callback})

if has("win32") || has("win64")

  exe "!start rundll32 url.dll,FileProtocolHandler ".auth_url."?oauth_token=".request_token."&domain=".domain."&scope=https://www.googleapis.com/auth/buzz"

else

  call system("xdg-open '".auth_url."?oauth_token=".request_token."'")

endif

let verifier = input("PIN:")

let [access_token, access_token_secret] = oauth#accessToken(access_token_url, consumer_key, consumer_secret, request_token, request_token_secret, {"oauth_verifier": verifier})

echo access_token

echo access_token_secret

let data = ''

\.'<entry xmlns:activity="http://activitystrea.ms/spec/1.0/"'

\.' xmlns:poco="http://portablecontacts.net/ns/1.0"'

\.' xmlns:georss="http://www.georss.org/georss"'

\.' xmlns:buzz="http://schemas.google.com/buzz/2010">'

\.'  <activity:object>'

\.'    <activity:object-type>http://activitystrea.ms/schema/1.0/note</activity:object-type>'

\.'    <content>Bzz! Bzz!</content>'

\.'  </activity:object>'

\.'</entry>'

let ret = oauth#post(post_url, consumer_key, consumer_secret, access_token, access_token_secret, {}, data, {"Content-Type": "application/atom+xml", "GData-Version": "2.0"})

echo ret
Atom APIなのでXMLでポストします。なお、今回GoogleのOAuthを使ったのですが、GoogleのOAuthってドメイン持ってないと使えないんですね。私はここのサイトを使いましたが、Google App EngineでもOKです。
まずココでドメインを登録します。実はこのドメイン名がconsumer_keyとなります。ドメインを登録するとconsumer_secretが貰えます。
またコールバック先のURLが必要になります。通常登録したドメイン上でもよいのですが、別のサイトでも構わない様です。さらにGoogle OAuthではリクエストトークンを取得する際、およびベリファイアを貰う際にscopeパラメータが必要です。個々のGoogleサービスによって異なりますので、ココの一覧を参照して設定して下さい。なお、Google Buzzについてはリストアップされていませんが、色々探して見つけました。
さて次にアクセストークンを取得するのですが、ここで気をつけないとハマる問題がありあます。
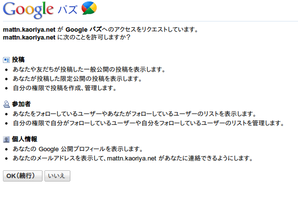
Authentication in the Google Data Protocol - Google Data Protocol - Google CodeGoogleのドキュメント通りでは成功しません。実は、このアクセストークン要求先は各サービスによって異なります。ここにアクセスしてもアクセストークン、アクセストークンシークレットは貰えるのですが、これを使ってアクセスしても401が返ります。Google Buzzであれば実際はGoogle Buzz専用の「https://www.google.com/buzz/api/auth/OAuthAuthorizeToken」にアクセスしなければなりません。こちらにはBuzzに対する許可設定画面も出てきます。
https://www.google.com/accounts/OAuthAuthorizeToken, referencing the request token and including the oauth_callback parameter. Google may prompt the user to log into their Google Account. Once authenticated with Google, the user chooses to share their data.
http://code.google.com/intl/ja/apis/gdata/docs/auth/overview.html
ここまでくればあとはAtomでXMLを送ればちゃんとBuzzってくれます。
ちなみにココが証拠ポスト。
追記
ちなみに日本語もOKでした。


