2018/08/25


tensorflow といえば Python と思っておられる方も多いのではないでしょうか。間違いではないのですが、これは初期に作られた Python 向けのバインディングに研究者達が多く食いついた結果に過ぎないと思っています。実際 tensorflow は現在 C言語、C++、Python、Java、Go から利用する事ができ、最近では JavaScript にも移植されています。筆者自身も Go で tensorflow を使ったシステムを構築し、運用保守しています。問題も発生せず機嫌良く動いています。学習の利用部分は GPU のパフォーマンスに依存しますが、それ以外の部分については各言語の実装に依存します。上手く作れば Python よりも速い実装にする事も可能です。とても便利な世の中になってきたのですが、学習環境に関しては Python 界で培われてきた資産が沢山あるので、それを使うのがやはり効率が良いです。しかしながら最近では、既に色々な研究者がモデルファイルを再利用可能な形で配布しており、独自のモデルを扱わないのであれば C/C++、Java や Go 等を使ってリーズナブルに認識処理を実装する事ができる様になりました。

Go で tensorflow をやろうとするユーザがもっと増えればいいなと思います。そこで今回は、Go でどうやって tensorflow を扱うかを、画像の認識プログラムを実装しながら説明したいと思います。

Go で tensorflow を使う為には libtensorflow.so が必要です。各 OS 向けにコンパイル済みのバイナリがあります。libtensorflow のインストールは以下のページが参考になります。

Installing TensorFlow for C  |  TensorFlow

TensorFlow provides a C API defined in c_api.h , which is suitable for building bindings for other l...

https://www.tensorflow.org/install/install_c

libtensorflow.so とヘッダファイルをシステムにインストールすればあとは go get で Go のパッケージがインストール出来ます。

go get github.com/tensorflow/tensorflow/tensorflow/go

最近の Go ではビルド結果がキャッシュされるので、一度 go get しておけば tensorflow の cgo パッケージが毎回ビルドされる事はありません。

さて、画像の認識プログラムを実装するには、まず物体を検出する為のモデルを持ってくる必要があります。ありがたい事に tensorflow のリポジトリで物体検出の学習済みモデルを提供してくれています。

models/research/object_detection at master - tensorflow/models - GitHub

Tensorflow Object Detection API Creating accurate machine learning models capable of localizing and ...

https://github.com/tensorflow/models/tree/master/research/object_detection

今回はこのリポジトリに含まれる ssd_mobilenet_v1_coco_11_06_2017.tar.gz を使います。このモデルは COCO (Common Objects in Context) で選定されたオブジェクトを Single Shot (Object) Detection する目的で作られた物で、以下の Jupyter Notebook からその手順を参照する事が出来ます。

models/object_detection_tutorial.ipynb at master - tensorflow/models - GitHub

YknZhu-patch-1 a3c_blogpost achowdhery-patch-1 achowdhery-patch-2 aselle-patch-1 asimshankar-patch-1...

https://github.com/tensorflow/models/blob/master/research/object_detection/object_detection_tutorial.ipynb

もしご自分で学習してみたい方は以下のページが参考になります。

Quick Start: Distributed Training on the Oxford-IIIT Pets Dataset on Google Cloud

Quick Start: Distributed Training on the Oxford-IIIT Pets Dataset on Google Cloud This page is a wal...

https://github.com/tensorflow/models/blob/master/research/object_detection/g3doc/running_pets.md

さらにご自分でアノテーションもやってみたい方はこのあたりを参考に XML ファイルを作る必要があります。なかなか骨が折れる作業ですが、うまくいくとこんな事が出来る様になります。

この学習済みモデルは、入力がデコード済みの画像バイナリ image_tensor、出力が認識した矩形 detection_boxes、認識したクラス名 detection_classes、認識率 detection_scores、認識個数 num_detections になります。クラス名は番号で帰ってくるので、このモデルを生成した際に使われたクラス名のリストが書かれたファイル coco_labels.txt も取得しておきます。

なお、Go で Python の学習済みモデルを利用するには ckpt 形式でなく Protocol Buffers の形式でなければなりません。

model, err := ioutil.ReadFile(filepath.Join(dir, "frozen_inference_graph.pb"))
if err != nil {
    log.Fatal(err)
}

labels, err := loadLabels(filepath.Join(dir, "coco_labels.txt"))
if err != nil {
    log.Fatal(err)
}

graph := tf.NewGraph()
if err := graph.Import(model, ""); err != nil {
    log.Fatal(err)
}

session, err := tf.NewSession(graph, nil)
if err != nil {
    log.Fatal(err)
}
defer session.Close()

次に画像ファイルからテンソルを作る必要があります。tensorflow/go/op パッケージに各種画像フォーマットに対するデコーダがありますので、以下の様に画像バイナリからノーマライズしつつテンソルを得る関数を作ります。

func decodeBitmapGraph() (*tf.Graph, tf.Output, tf.Output, error) {
    s := op.NewScope()
    input := op.Placeholder(s, tf.String)
    output := op.ExpandDims(
        s,
        op.DecodeBmp(s, input, op.DecodeBmpChannels(3)),
        op.Const(s.SubScope("make_batch"), int32(0)))
    graph, err := s.Finalize()
    return graph, input, output, err
}

今回の例ではやっていませんが、例えば画像をリサイズしつつ、偏差を用いてノーマライズしてテンソルを得るグラフであれば以下の様に実装します。

// Div and Sub perform (value-Mean)/Scale for each pixel
output := op.Div(s,
    op.Sub(s,
        // Resize to 224x224 with bilinear interpolation
        op.ResizeBilinear(s,
            // Create a batch containing a single image
            op.ExpandDims(s,
                // Use decoded pixel values
                op.Cast(s, decode, tf.Float),
                op.Const(s.SubScope("make_batch"), int32(0))),
            op.Const(s.SubScope("size"), []int32{H, W})),
        op.Const(s.SubScope("mean"), Mean)),
    op.Const(s.SubScope("scale"), Scale))

これは変換処理自身の実装ではなく、GPU に画像の変換機を送り込む為の準備です。この変換機を使って、画像のバイナリからテンソルを作ります。ちなみに以下の関数では Go の image.Image も作っていますが、これは後で画像にマーカーを描き込む為のベース画像として利用する為です。

func makeTensorFromImage(img []byte) (*tf.Tensor, image.Image, error) {
    tensor, err := tf.NewTensor(string(img))
    if err != nil {
        return nilnil, err
    }
    normalizeGraph, input, output, err := decodeBitmapGraph()
    if err != nil {
        return nilnil, err
    }
    normalizeSession, err := tf.NewSession(normalizeGraph, nil)
    if err != nil {
        return nilnil, err
    }
    defer normalizeSession.Close()
    normalized, err := normalizeSession.Run(
        map[tf.Output]*tf.Tensor{input: tensor},
        []tf.Output{output},
        nil)
    if err != nil {
        return nilnil, err
    }

    r := bytes.NewReader(img)
    i, _, err := image.Decode(r)
    if err != nil {
        return nilnil, err
    }
    return normalized[0], i, nil
}

テンソルが得られたら後は上記の通り、image_tensor を入力、detection_boxes, detection_scores, detection_classes, num_detections を出力としたセッションを実行します。

func detectObjects(session *tf.Session, graph *tf.Graph, input *tf.Tensor) ([]float32, []float32, [][]float32error) {
    inputop := graph.Operation("image_tensor")
    output, err := session.Run(
        map[tf.Output]*tf.Tensor{
            inputop.Output(0): input,
        },
        []tf.Output{
            graph.Operation("detection_boxes").Output(0),
            graph.Operation("detection_scores").Output(0),
            graph.Operation("detection_classes").Output(0),
            graph.Operation("num_detections").Output(0),
        },
        nil)
    if err != nil {
        return nilnilnil, fmt.Errorf("Error running session: %v", err)
    }
    probabilities := output[1].Value().([][]float32)[0]
    classes := output[2].Value().([][]float32)[0]
    boxes := output[0].Value().([][][]float32)[0]
    return probabilities, classes, boxes, nil
}

後は得られた結果から元画像の座標に変換し、四角やテキストを書き込みます。

probabilities, classes, boxes, err := detectObjects(session, graph, tensor)
if err != nil {
    log.Fatalf("error making prediction: %v", err)
}

bounds := img.Bounds()
canvas := image.NewRGBA(bounds)
draw.Draw(canvas, bounds, img, image.Pt(00), draw.Src)
:= 0
for float64(probabilities[i]) > probability {
    idx := int(classes[i])
    y1 := int(float64(bounds.Min.Y) + float64(bounds.Dy())*float64(boxes[i][0]))
    x1 := int(float64(bounds.Min.X) + float64(bounds.Dx())*float64(boxes[i][1]))
    y2 := int(float64(bounds.Min.Y) + float64(bounds.Dy())*float64(boxes[i][2]))
    x2 := int(float64(bounds.Min.X) + float64(bounds.Dx())*float64(boxes[i][3]))
    drawRect(canvas, image.Rect(x1, y1, x2, y2), color.RGBA{255000})
    drawString(
        canvas,
        image.Pt(x1, y1),
        colornames.Map[colornames.Names[idx]],
        fmt.Sprintf("%s (%2.0f%%)", labels[idx], probabilities[idx]*100.0))
    i++
}

実行は以下の様に行います。

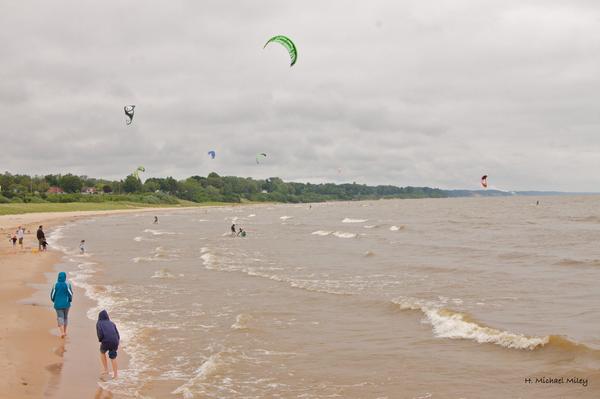
./go-object-detect-from-image input.jpg

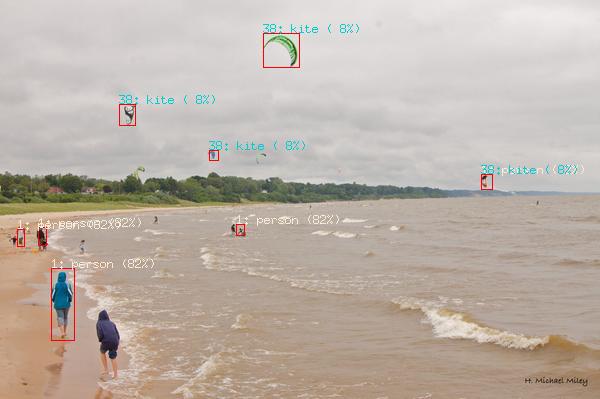
実行すると output.jpg というファイルが出力され、以下の様にマーカーが表示されます。

tensorflow/go
tensorflow/go

コードは GitHub に置いてあります。

GitHub - mattn/go-object-detect-from-image

go-object-detect-from-image detect objects from image file Usage ./go-object-detect-from-image input...

https://github.com/mattn/go-object-detect-from-image

モデルファイルとラベルファイルも同梱してあるので、ビルドすればそのまま実行出来る様にしてあります。要点だけ掴めばそれほど難しくないですし、他のモデルファイルを使って色々な物体検出を試す事も出来ます。Go で tensorflow を使っているユーザはこれからもっと増えると思います。ぜひ面白いプログラムを作ってみて下さい。

TensorFlowではじめるDeepLearning実装入門 (impress top gear) TensorFlowではじめるDeepLearning実装入門 (impress top gear)
新村 拓也
インプレス 単行本(ソフトカバー) / ¥148 (2018年02月16日)
 
発送可能時間:

Posted at by


2018/06/07


いつもは Software Design で「Vim の細道」という連載記事を担当していますが、7月号はお休みさせて頂き Vim 特集「Vim 絶対主義」の執筆に参加させて頂きました。

ソフトウェアデザイン 2018年7月号 ソフトウェアデザイン 2018年7月号

技術評論社 雑誌 / ¥172 (2018年06月18日)
 
発送可能時間:

テキストエディタ「Vim」は開発環境の選択肢の1つとして、世界中のエンジニアに選ばれ続けています。

ランキングによってはIDE(統合開発環境)にも引けを取らないほどのユーザ数の多さを示していますが、一体Vimの何が、これほどまで人々を惹きつけているのでしょうか。

本特集ではVimを触ったことがないという入門者向けに、vi/Vimの歴史の解説から環境ごとのインストール、基本操作、設定方法、プラグインの入れ方まで手厚く解説しています。

手元の環境にVimを入れて実際に動かすことで、「なぜVimなのか」の答えがわかるかもしれません。

Vim の歴史を紐解き、なぜこんな操作方法になっているのか、なぜそれが良いのかといった分析、インストール方法、基本操作(とは言ってもこれだ知っていれば十分)、設定方法、プラグインの導入方法など、Vim を知る上で必要な物がこの1冊に収まっています。今回はなんとあの Vimmer とあの Vimmer、そしてなんとあの Vimmer が執筆に参加しています。ぜひお手に取って読んで頂きたいです。何度も繰り返し読んで頂ける特集になれば嬉しいです。

Posted at by


2018/05/31


Go は goroutine という非同期の仕組みを提供していますが、使い方次第では色々なパターンが実装できる為、初めて goroutine を見た人はどの様な物が正解なのか分からない事があります。以前、このブログでも紹介した事がありますが Go の非同期の仕組みは一見単純な様に見えて実はとても奥深いのです。

Big Sky :: golang の channel を使ったテクニックあれこれ

golang の channel は他の言語に見ない独特のパラダイムを開発者に提供します。 単純にスレッド間でメッセージングをするだけでもC言語で書けばそこそこの量になったり、慣れていない人であればど...

https://mattn.kaoriya.net/software/lang/go/20160706165757.htm
2012 年に Rob Pike 氏が Google I/O で「Go Concurrency Patterns」というトークを行いました。Gopher (Go言語使い) には結構有名なトークでしたが、改めてこのトークで紹介された Go の非同期パターンをおさらいする事で Go の魅力を感じとって頂けたらと思います。

以下はスライド。

Go Concurrency Patterns
https://talks.golang.org/2012/concurrency.slide#1

以下のリポジトリにトークで紹介されたコードが集められています。

GitHub - kevchn/go-concurrency-patterns: Golang concurrency patterns from Rob Pike's 2012 Google I/O talk

Golang concurrency patterns from Rob Pike's 2012 Google I/O talk

https://github.com/kevchn/go-concurrency-patterns

それぞれどの様に動くのか解説します。

基本 - 1-1-basics.go

//  Kevin Chen (2017)
//  Patterns from Pike's Google I/O talk, "Go Concurrency Patterns"

//  Exposition of Golang's concurrency primitives

package main

import (
    "fmt"
    "time"
)

func main() {
    go regular_print("Hello")
    fmt.Println("Second print statement!")
    time.Sleep(3 * time.Second)
    fmt.Println("Third print statement!"// when main returns, the goroutines also end
}

func regular_print(msg string) {
    for i := 0; ; i++ {
        fmt.Println(msg, i)
        time.Sleep(time.Second)
    }
}

The Go Playground

数字の出力は数秒すると停止します。main が終了すると goroutine も終了する事を理解しましょう。

channel - 1-2-channel.go

//  Kevin Chen (2017)
//  Patterns from Pike's Google I/O talk, "Go Concurrency Patterns"

//  Golang channels

package main

import (
    "fmt"
    "time"
)

func main() {
    ch := make(chan string)
    go channel_print("Hello", ch)
    for i := 0; i < 3; i++ {
        fmt.Println(<-ch) // ends of channel block until both are ready
                          // NOTE: golang supports buffered channels, like mailboxes (no sync)
    }
    fmt.Println("Done!")
}

func channel_print(msg string, ch chan string) {
    for i := 0; ; i++ {
        ch <- fmt.Sprintf("%s %d", msg, i)
        time.Sleep(time.Second)
    }
}

The Go Playground

channel はバッファが1の場合(デフォルト)、送信側と受信側の両方が準備できるまでブロックします。3回読み取るまで goroutine が先に終了してしまう事はないという事です。

ジェネレータ - 1-3-generator.go

//  Kevin Chen (2017)
//  Patterns from Pike's Google I/O talk, "Go Concurrency Patterns"

//  Golang generator pattern: functions that return channels

package main

import (
    "fmt"
    "time"
)

// goroutine is launched inside the called function (more idiomatic)
// multiple instances of the generator may be called

func main() {
    ch := generator("Hello")
    for i := 0; i < 5; i++ {
        fmt.Println(<- ch)
    }
}

func generator(msg string<-chan string { // returns receive-only channel
    ch := make(chan string)
    go func() { // anonymous goroutine
        for i := 0; ; i++ {
            ch <- fmt.Sprintf("%s %d", msg, i)
            time.Sleep(time.Second)
        }
    }()
    return ch
}

The Go Playground

関数呼び出しの中で goroutine を起動するとジェネレータを複数インスタンス生成できます。

ロックステップ - 1-4-lockstep.go

//  Kevin Chen (2017)
//  Patterns from Pike's Google I/O talk, "Go Concurrency Patterns"

//  Golang channels as handles on a service (working in lockstep)

package main

import (
    "fmt"
    "time"
)

func main() {
    ch1 := generator("Hello")
    ch2 := generator("Bye")
    for i := 0; i < 5; i++ {
        fmt.Println(<- ch1)
        fmt.Println(<- ch2)
    }
}

func generator(msg string<-chan string { // returns receive-only channel
    ch := make(chan string)
    go func() { // anonymous goroutine
        for i := 0; ; i++ {
            ch <- fmt.Sprintf("%s %d", msg, i)
            time.Sleep(time.Second)
        }
    }()
    return ch
}

The Go Playground

Hello/Bye のセットが1秒間隔で出力されます。順番に読み取っているので必ず順番に表示されます。

多重送信 - 1-5-fanin.go

//  Kevin Chen (2017)
//  Patterns from Pike's Google I/O talk, "Go Concurrency Patterns"

//  Golang multiplexing (fan-in) function to allow multiple channels go through one channel

package main

import (
    "fmt"
    "time"
)

func main() {
    ch := fanIn(generator("Hello"), generator("Bye"))
    for i := 0; i < 10; i++ {
        fmt.Println(<- ch)
    }
}

// fanIn is itself a generator
func fanIn(ch1, ch2 <-chan string<-chan string { // receives two read-only channels
    new_ch := make(chan string)
    go func() { for { new_ch <- <-ch1 } }() // launch two goroutine while loops to continuously pipe to new channel
    go func() { for { new_ch <- <-ch2 } }()
    return new_ch
}

func generator(msg string<-chan string { // returns receive-only channel
    ch := make(chan string)
    go func() { // anonymous goroutine
        for i := 0; ; i++ {
            ch <- fmt.Sprintf("%s %d", msg, i)
            time.Sleep(time.Second)
        }
    }()
    return ch
}

The Go Playground

それぞれの channel から new_ch にリダイレクトする事で多重送信が作れます。処理順に new_ch に書きこまれるので順番はタイミング次第になります。

同調 - 1-6-restoring-sequencing.go

//  Kevin Chen (2017)
//  Patterns from Pike's Google I/O talk, "Go Concurrency Patterns"

//  Golang restoring sequencing after multiplexing

package main

import (
    "fmt"
    "time"
)

type Message struct {
    str string
    block chan int
}

func main() {
    ch := fanIn(generator("Hello"), generator("Bye"))
    for i := 0; i < 10; i++ {
        msg1 := <-ch
        fmt.Println(msg1.str)

        msg2 := <-ch
        fmt.Println(msg2.str)

        <- msg1.block // reset channel, stop blocking
        <- msg2.block
    }
}

// fanIn is itself a generator
func fanIn(ch1, ch2 <-chan Message) <-chan Message { // receives two read-only channels
    new_ch := make(chan Message)
    go func() { for { new_ch <- <-ch1 } }() // launch two goroutine while loops to continuously pipe to new channel
    go func() { for { new_ch <- <-ch2 } }()
    return new_ch
}

func generator(msg string<-chan Message { // returns receive-only channel
    ch := make(chan Message)
    blockingStep := make(chan int// channel within channel to control exec, set false default
    go func() { // anonymous goroutine
        for i := 0; ; i++ {
            ch <- Message{fmt.Sprintf("%s %d", msg, i), blockingStep}
            time.Sleep(time.Second)
            blockingStep <- 1 // block by waiting for input
        }
    }()
    return ch
}

The Go Playground

1-5-fanin.go は同じ1秒ずつの処理ですが、ずれが生じてくると同調しなくなります。この様にループの末尾で msg1.blockmsg2.block 待ち、次の channel 読み取りを行わせない事で同調を作る事が出来ます。

先着処理 - 1-7-select-fanin.go

//  Kevin Chen (2017)
//  Patterns from Pike's Google I/O talk, "Go Concurrency Patterns"

//  Select is a control structure for concurrency (why channels/goroutines are built in; not library)
//  Based off of Dijkstra's guarded commands... providing an idiomatic way for concurrent processes to
//  pass in data without programmer having to worry about 'steps'

package main

import (
    "fmt"
    "time"
)

func main() {
    ch := fanIn(generator("Hello"), generator("Bye"))
    for i := 0; i < 10; i++ {
        fmt.Println(<- ch)
    }
}

// fanIn is itself a generator
func fanIn(ch1, ch2 <-chan string<-chan string { // receives two read-only channels
    new_ch := make(chan string)
    go func() {
        for {
            select {
                case s := <-ch1: new_ch <- s
                case s := <-ch2: new_ch <- s
            }
        }
    }()
    return new_ch
}

func generator(msg string<-chan string { // returns receive-only channel
    ch := make(chan string)
    go func() { // anonymous goroutine
        for i := 0; ; i++ {
            ch <- fmt.Sprintf("%s %d", msg, i)
            time.Sleep(time.Second)
        }
    }()
    return ch
}

The Go Playground

select を使うと channel の受信を同時に待つことが出来ます。この場合、どちらか先に受信したほうのメッセージが new_ch に流れてきます。

タイムアウト - 1-8-timeout-select.go

//  Kevin Chen (2017)
//  Patterns from Pike's Google I/O talk, "Go Concurrency Patterns"

//  In non deterministic select control block, 1 second timer (created each iteration) may
//  time out if channel does not return a string in a second

package main

import (
    "fmt"
    "time"
)

func main() {
    ch := generator("Hi!")
    for i := 0; i < 10; i++ {
        select {
        case s := <-ch:
            fmt.Println(s)
        case <-time.After(1 * time.Second): // time.After returns a channel that waits N time to send a message
            fmt.Println("Waited too long!")
            return
        }
    }
}

func generator(msg string<-chan string { // returns receive-only channel
    ch := make(chan string)
    go func() { // anonymous goroutine
        for i := 0; ; i++ {
            ch <- fmt.Sprintf("%s %d", msg, i)
            time.Sleep(time.Second)
        }
    }()
    return ch
}

The Go Playground

time.After は引数で貰った所要時間だけ有効な channel を返します。このコードでは毎回 time.After を呼び出しているので goroutine が 1 秒以内にメッセージを送信してくる場合に限ってメッセージが表示されます。タイミング次第なのでメッセージが幾つ表示されるかは確定しません。

全体的なタイムアウト - 1-9-timeout-direct-select.go

//  Kevin Chen (2017)
//  Patterns from Pike's Google I/O talk, "Go Concurrency Patterns"

//  Global timer returns after 5 seconds, stopping execution in select control block

package main

import (
    "fmt"
    "time"
)

func main() {
    ch := generator("Hi!")
    timeout := time.After(5 * time.Second)
    for i := 0; i < 10; i++ {
        select {
        case s := <-ch:
            fmt.Println(s)
        case <-timeout: // time.After returns a channel that waits N time to send a message
            fmt.Println("5s Timeout!")
            return
        }
    }
}

func generator(msg string<-chan string { // returns receive-only channel
    ch := make(chan string)
    go func() { // anonymous goroutine
        for i := 0; ; i++ {
            ch <- fmt.Sprintf("%s %d", msg, i)
            time.Sleep(time.Second)
        }
    }()
    return ch
}

The Go Playground

最初に5秒だけ有効な channel を作っているので5秒間は ch からの読み取りが有効になります。ほぼ5回表示されます。

select の終了 - 2-1-quit-select.go

//  Kevin Chen (2017)
//  Patterns from Pike's Google I/O talk, "Go Concurrency Patterns"

//  Deterministically quit goroutine with quit channel option in select

package main

import (
    "fmt"
    "math/rand"
)

func main() {
    quit := make(chan bool)
    ch := generator("Hi!", quit)
    for i := rand.Intn(50); i >= 0; i-- {
        fmt.Println(<-ch, i)
    }
    quit <- true
}

func generator(msg string, quit chan bool<-chan string { // returns receive-only channel
    ch := make(chan string)
    go func() { // anonymous goroutine
        for {
            select {
            case ch <- fmt.Sprintf("%s", msg):
                // nothing
            case <-quit:
                fmt.Println("Goroutine done")
                return
            }
        }
    }()
    return ch
}

The Go Playground

終了用の channel quit を作り main 側は終了指示、goroutine 側はそれを受信してループを終了します。

終了の受信 - 2-2-receive-quit.go

//  Kevin Chen (2017)
//  Patterns from Pike's Google I/O talk, "Go Concurrency Patterns"

//  Deterministically quit goroutine with quit channel option in select

package main

import (
    "fmt"
    "math/rand"
)

func main() {
    quit := make(chan string)
    ch := generator("Hi!", quit)
    for i := rand.Intn(10); i >= 0; i-- {
        fmt.Println(<-ch, i)
    }
    quit <- "Bye!"
    fmt.Printf("Generator says %s"<-quit)
}

func generator(msg string, quit chan string<-chan string { // returns receive-only channel
    ch := make(chan string)
    go func() { // anonymous goroutine
        for {
            select {
            case ch <- fmt.Sprintf("%s", msg):
                // nothing
            case <-quit:
                quit <- "See you!"
                return
            }
        }
    }()
    return ch
}

The Go Playground

2-1-quit-select.go は main 側から終了を指示しましたが、こちらは goroutine 側から完了通知を送る事で main は goroutine の終了を待ちます。

チェイン - 2-3-daisy-chain.go

//  Kevin Chen (2017)
//  Patterns from Pike's Google I/O talk, "Go Concurrency Patterns"

//  Daisy chaining goroutines... all routines at once, so if one is fulfilled
//  everything after should also have their blocking commitment (input) fulfilled

package main

import (
    "fmt"
)

// takes two int channels, stores right val (+1) into left
func f(left, right chan int) {
    left <- 1 + <-right // bafter 1st right read, locks until left read
}

func main() {
    const n = 10000

    // construct an array of n+1 int channels
    var channels [n + 1]chan int
    for i := range channels {
        channels[i] = make(chan int)
    }

    // wire n goroutines in a chain
    for i := 0; i < n; i++ {
        go f(channels[i], channels[i+1])
    }

    // insert a value into right-hand end
    go func(c chan<- int) { c <- 1 }(channels[n])

    // get value from the left-hand end
    fmt.Println(<-channels[0])
}

The Go Playground

2つの channel を貰って右から左へ受け流す(♪)関数 f を 10000 個 groutine として起動しておきます。この状態では全て入力待ちになりますが、一番末尾の channel に 1 を流し込むと、関数 f が右の channel から得た値を +1 して左の channel に渡し、その channel を読み取って各 goroutine が動き出します。実際には main の一番最後で channel を読み取るまで末尾の channel 送信は行われませんので、channel がバッファを持たないのであればこのコードの様に goroutine で送信する必要があります。

Google 検索 - 2-4-google-search.go

//  Kevin Chen (2017)
//  Patterns from Pike's Google I/O talk, "Go Concurrency Patterns"

//  Using go patterns with experiment 'Google Search' i.e concurrent goroutines getting results

package main

import (
    "fmt"
    "math/rand"
    "time"
)

var (
    Web    = fakeSearch("web")
    Web2   = fakeSearch("web")
    Image  = fakeSearch("image")
    Image2 = fakeSearch("image")
    Video  = fakeSearch("video")
    Video2 = fakeSearch("video")
)

type Result string
type Search func(query string) Result

func main() {
    rand.Seed(time.Now().UnixNano())
    start := time.Now()
    results := Google("golang"// collate results
    elapsed := time.Since(start)
    fmt.Println(results)
    fmt.Println(elapsed)
}

func fakeSearch(kind string) Search {
    return func(query string) Result {
        time.Sleep(time.Duration(rand.Intn(100)) * time.Millisecond)
        return Result(fmt.Sprintf("%s result for %q\n", kind, query))
    }
}

func First(query string, replicas ...Search) Result {
    c := make(chan Result)
    searchReplica := func(i int) { c <- replicas[i](query) }
    for i := range replicas {
        go searchReplica(i)
    }
    return <-c
}

func Google(query string) (results []Result) {
    c := make(chan Result)
    go func() { c <- First(query, Web, Web2) }()
    go func() { c <- First(query, Image, Image2) }()
    go func() { c <- First(query, Video, Video2) }()

    timeout := time.After(80 * time.Millisecond)

    for i := 0; i < 3; i++ {
        select {
        case result := <-c:
            results = append(results, result)
        case <-timeout:
            fmt.Println("timed out")
            return
        }
    }
    return
}

The Go Playground

Google で検索するとウェブ検索結果と画像検索結果と動画検索結果が同時に表示されます。これを実現する方法を紹介しています。関数 Google を呼び出すと各 groutine が処理を開始し、結果の channel に書き込みます。結果は3つに決まっているのでループを3回 channel を読み取っていますが、一定以上処理に時間が掛かる処理結果は無視する様になっています。

この様に、Go 言語(golang) が提供する channel と goroutine の2つだけを使うだけでも色んなパターンを作る事が出来ます。おそらくこれだけではありません。面白いパターンを発明してみて下さい。

みんなのGo言語[現場で使える実践テクニック] みんなのGo言語[現場で使える実践テクニック]
松木雅幸, mattn, 藤原俊一郎, 中島大一, 牧大輔, 鈴木健太
技術評論社 Kindle版 / ¥2,178 (2016年09月09日)
 
発送可能時間:

Posted at by