twissr.js※右クリックして名前を付けて保存です。
※ソース閲覧禁止です。
mixi for iPhoneから発掘されたmixi日記投稿用API « kuって事でさっそくPlagger用にPublish::MixiDiary書いてみました。出来立てほやほやなので、あまりテストしていません。codereposに上げているので、良かったらテストしてみて下さい。
iPhoneからぜんぜん日記を書く手段がなかったらmixiから、mixi for iPhoneという日記を書いたりするiPhoneアプリが公開されました!
新しいアプリに新しいAPI、日記が投稿できるアプリなら日記投稿用のAPIというわけでmixiのあしあとAPI発掘と同じように掘り起こして見つけました。
ほかのAPIと同様、認証はWSSEでatomPubで日記を書くことができるようになっていました。エンドポイントはhttp://mixi.jp/atom/diary/member_id=mixiIDです。
http://ido.nu/kuma/2008/07/30/digging-mixi-for-iphone-application-and-new-api-for-posting-a-diary-with-a-photo/
Publish::MixiDiaryちなみに中ではたけまるさんのAtompubを使っています。
google-app-engine-oil - Google Coderailsを狙ってるのかなぁ。
Yet another web framework on Google App Engine.
Google App Engine Oil (GAEO) is an open-source web framework running on Google App Engine. It enables the web development on App Engine quick and less configurations.
http://code.google.com/p/google-app-engine-oil/
# gaeo.py hello

The hello project has been created.
これだけでも動きます。試しに
# cd hello

# dev_appserver.py .

...
としてブラウザで"http://localhost:8080/"を開くと
いう画面が起動します。これだけでも実はモデルやディスパッチャやコントローラが生成され、テンプレートが用意されているのでいきなりコーディングが始められます。
# gaeogen.py controlller say

Creating application/templates/say/ ...

Creating say.py
これでsayコントローラが生成されます。中身は
from gaeo.controller import BaseController


class SayController(BaseController):

    pass
こんな感じ。あとはこれを少し修正して
#!-*- coding:utf-8 -*-

from gaeo.controller import BaseController


class SayController(BaseController):

  def hello(self):

    self.render(text = 'こんにちわ世界')
とし、"http://localhost:8080/say/hello"にアクセスすると"こんにちわ世界"と表示されます。また"templates/say/"に"hello.html"を以下の様に作成し
こんにちわ {{ word }}
先ほどのsay.pyを以下の様に書き換えます。
#!-*- coding:utf-8 -*-

from gaeo.controller import BaseController


class SayController(BaseController):

  def hello(self):

    self.render(

        template = 'hello',

        values = { 'word' : '世界' }

    )
これでテンプレートを使ったページが出来上がります。
#!-*- coding:utf-8 -*-

from gaeo.controller import BaseController


class SayController(BaseController):

  def hello(self):

    self.render(

        xml = '<xml />',

    )
としたり
#!-*- coding:utf-8 -*-

from gaeo.controller import BaseController


class SayController(BaseController):

  def hello(self):

    self.render(

        json = '{ word : "Hello, World!" }',

    )
とするだけで、正しいContent-Typeを返してくれるようになります。Big Sky :: XSLとjQuery/HTMLだけで作る、amazon最速検索どうやら、jQueryがcacheを無効にする時に使用する特殊パラメータ"_"がAmazonで蹴られる様になったのが原因です。
http://mattn.kaoriya.net/software/lang/javascript/20080605165643.htm
$.ajaxSettings.cache = true;
まぁ、Amazon検索にはリアルタイムなキャッシュ無効は必要なさそうなので、これで良しとします。Google App Engine Blog: Some small updates!最新版のダウンロードはこちらから。
We're happy to announce we've released some small updates to Google App Engine. Among the more significant changes:
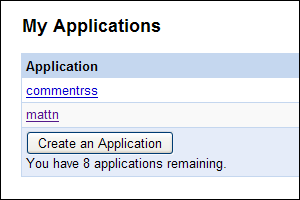
- More apps: Want to create more than 3 applications with your App Engine account? Now you can now create up to 10!
- Time windows for Dashboard graphs: Zoom in on the data in your dashboard to get a more accurate picture of whats going on. You can zoom in to see graphs for the last 24, 12, and 6 hour periods.
- Logs export: You can now use appcfg.py to download your application's logs in plaintext format. Use appcfg.py --help for more information on how to download your logs.
- Send email as logged in user: If you're using the users API, you can now send email from the email address of the currently-logged-in user.
ダッシュボードのデータ時系列が拡大できる様になって
appcfg.pyでログがエクスポート出来る様になって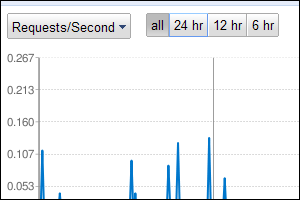
# appcfg.py request_logs <directory> <output_file>
現在ログイン中のユーザのメールアドレスが得られる様になったらしい。
:ua MyUserAgent
でUser Agent Switcherに"MyUserAgent"という名前で登録されたUser Agentに変更します。
:ua Default
でリセット
:ua!
で設定ダイアログ表示となります。uaSwitch.jsよろしければどーぞ。
protobuf - Google Codeまず、インストールは以下の様に行いました。なおprotobufを展開したフォルダは以下のフォルダ。
Protocol Buffers are a way of encoding structured data in an efficient yet extensible format. Google uses Protocol Buffers for almost all of its internal RPC protocols and file formats.
C:¥temp¥protobuf-2.0.0beta¥
C:¥temp¥protobuf-2.0.0beta¥java> mvn test install
とすれば必要なライブラリがダウンロードされ、テスト後インストールされる。
C:¥temp¥protobuf-2.0.0beta¥python> python setup.py bdist_wininst

...

C:¥temp¥protobuf-2.0.0beta¥python> cd dist

C:¥temp¥protobuf-2.0.0beta¥python¥dist> protobuf-2.0.0beta.win32.exe
※Windowsじゃない人は"bdist_wininst"の代わりに"bdist_rpm"とか"install"とか...
package protocol;


message Person {

  required string name = 1;

  required int32  age  = 2;

}
このファイルを指定して、スタブクラスを生成する。
C:¥temp¥protobuf-2.0.0beta¥tmp> protoc --cpp_out=. person.proto
これで"person.pb.cc"と"person.pb.h"が生成される。以下テストコード。
#include <iostream>

#include <fstream>

#include <person.pb.h>


void save(const char* fn) {

    protocol::Person person;


    person.set_name("mattn");

    person.set_age(18);


    std::ofstream ofs(fn);

    person.SerializeToOstream(&ofs);

    ofs.close();

}


void load(const char* fn) {

    protocol::Person person;


    std::ifstream ifs(fn);

    person.ParseFromIstream(&ifs);


    std::cout <<

        "name:" << person.name() <<

        ",age:" << person.age() << std::endl;

}


int main(int argc, char* argv[]) {

    if (argc != 2) return -1;


    save(argv[1]);

    load(argv[1]);


    return 0;

}
ビルドは以下の手順で行う。
C:¥temp¥protobuf-2.0.0beta¥tmp> cl -I../src -I. /EHsc test.cpp person.pb.cc libprotoc.lib libprotobuf.lib
実行すると
C:¥temp¥protobuf-2.0.0beta¥tmp> test person_cpp.txt

name:mattn,age:18
と表示される。そう...18歳です。ウソです。
^Emattn^P#
次にjava版。"person.proto"というファイル名からPersonクラスを生成する際にファイル名がバッティングしてしまうので"persons.proto"という別名にコピーしておく。
C:¥temp¥protobuf-2.0.0beta¥tmp> protoc --java_out=. persons.proto
"protocol/Persons.java"が生成される。
import protocol.Persons;

import java.io.FileInputStream;

import java.io.FileOutputStream;


public class test {

    public static void main(String[] args) throws Exception {

        Persons.Person.Builder personBuilder = Persons.Person.newBuilder();

        Persons.Person mattn = personBuilder.setName("mattn").setAge(18).build();


        FileOutputStream fos = new FileOutputStream(args[0]);

        mattn.writeTo(fos);

        fos.close();


        FileInputStream fin = new FileInputStream(args[0]);

        mattn = Persons.Person.parseFrom(fin);

        fin.close();


        System.out.printf("name:%s,age:%d", mattn.getName(), mattn.getAge());

    }

}
ビルドは以下の手順で行う。
C:¥temp¥protobuf-2.0.0beta¥tmp> javac -classpath protobuf-java-2.0.0beta.jar; test.java
実行結果はcpp版と同様。
C:¥temp¥protobuf-2.0.0beta¥tmp> protoc --python_out=. person.proto
"person_pb2.py"が生成される。以下テストコード
import sys

from person_pb2 import Person


fn = sys.argv[1]


person = Person()

person.name = "mattn"

person.age = 18

open(fn, "w").write(person.SerializeToString())


person = Person()

person.ParseFromString(open(fn).read())

print "name:%s,age:%d" % (person.name, person.age)
実行結果はcpp版、java版と同様。The Unofficial Blosxom User Group :: Blosxom 2.1.0 releasedバージョンアップの内容としては以下の通り。
New features
http://blosxom.ookee.com/blog/news/blosxom-2.1.0-released.html
- Support for external config files and multi-instance installations via environment variables. (Inspired and loosely based on the Debian patches for Blosxom 2.0.2.)
- Support for multiple plugin directories using $plugin_path and @INC.
- Support for configuring the plugins to use in a config file.
- The default feed templates are now in RSS 2.0 format and prevent duplicated stories in feed readers or aggregators if posts are changed after publishing using a GUID element in each feed item.
- There's now an encoding setting which controls what charset your blog and feeds should be marked as.
SetEnv BLOSXOM_CONFIG_FILE /path/to/my/blosxom/config/file/bloxsom.conf
とすることでblosxom.cgiを全く弄らずに動かす事が出来る様になりました。TheSchwartzで仕事をあとにまわす - bits and bytes
なければ勝手に作ってくれるのかなと思ってSYNOPSISのコードを実行してみたけどやっぱり自動でできたりはしなそうだったので調べたらCatalyst and TheSchwartz: Reliable JobQueue in a great framework - Voxにschema.sqlを使うといいと書いてありました。このスキーマをmysqlで実行すればTheSchwartzのキューを管理するためのテーブルが出来上がります。
http://labs.gmo.jp/blog/ku/2008/06/theschwartz.html
Twitter / ku: TheSchwartzおもしろかった sqliteで動...
TheSchwartzおもしろかった sqliteで動くようにしたいけどsqliteようのschemeかきかたわかんない
http://twitter.com/ku/statuses/843135311
CREATE TABLE funcmap (

        funcid         INT UNSIGNED PRIMARY KEY NOT NULL AUTO_INCREMENT,

        funcname       VARCHAR(255) NOT NULL,

        UNIQUE(funcname)

);


CREATE TABLE job (

        jobid           BIGINT UNSIGNED PRIMARY KEY NOT NULL AUTO_INCREMENT,

        funcid          INT UNSIGNED NOT NULL,

        arg             MEDIUMBLOB,

        uniqkey         VARCHAR(255) NULL,

        insert_time     INTEGER UNSIGNED,

        run_after       INTEGER UNSIGNED NOT NULL,

        grabbed_until   INTEGER UNSIGNED NOT NULL,

        priority        SMALLINT UNSIGNED,

        coalesce        VARCHAR(255),

        INDEX (funcid, run_after),

        UNIQUE(funcid, uniqkey),

        INDEX (funcid, coalesce)

);


CREATE TABLE note (

        jobid           BIGINT UNSIGNED NOT NULL,

        notekey         VARCHAR(255),

        PRIMARY KEY (jobid, notekey),

        value           MEDIUMBLOB

);


CREATE TABLE error (

        error_time      INTEGER UNSIGNED NOT NULL,

        jobid           BIGINT UNSIGNED NOT NULL,

        message         VARCHAR(255) NOT NULL,

        funcid          INT UNSIGNED NOT NULL DEFAULT 0,

        INDEX (funcid, error_time),

        INDEX (error_time),

        INDEX (jobid)

);


CREATE TABLE exitstatus (

        jobid           BIGINT UNSIGNED PRIMARY KEY NOT NULL,

        funcid          INT UNSIGNED NOT NULL DEFAULT 0,

        status          SMALLINT UNSIGNED,

        completion_time INTEGER UNSIGNED,

        delete_after    INTEGER UNSIGNED,

        INDEX (funcid),

        INDEX (delete_after)

);
というSQLなので、これをSQLite用に書き換えます。cl.pocari.org - SQLite で auto-increment なフィールドを作成する方法こちらの記事でも書かれている通り、SQLiteではINTEGER PRIMARY KEYを指定すればok。
つまり,SQLite で auto-increment なフィールドを作りたければ,INTEGER PRIMARY KEY を指定してあげればいいらしい.
http://cl.pocari.org/2006-02-12-1.html
CREATE TABLE funcmap (

        funcid         INTEGER PRIMARY KEY,

        funcname       VARCHAR(255) NOT NULL,

        UNIQUE(funcname)

);


CREATE TABLE job (

        jobid           INTEGER PRIMARY KEY,

        funcid          INTEGER NOT NULL,

        arg             MEDIUMBLOB,

        uniqkey         VARCHAR(255) NULL,

        insert_time     INTEGER UNSIGNED,

        run_after       INTEGER UNSIGNED NOT NULL,

        grabbed_until   INTEGER UNSIGNED NOT NULL,

        priority        SMALLINT UNSIGNED,

        coalesce        VARCHAR(255),

        UNIQUE(funcid, uniqkey)

);

CREATE INDEX job_idx_1 ON job (funcid, run_after);

CREATE INDEX job_idx_2 ON job (funcid, coalesce);


CREATE TABLE note (

        jobid           INTEGER NOT NULL,

        notekey         VARCHAR(255),

        value           BLOB

);


CREATE TABLE error (

        error_time      INTEGER UNSIGNED NOT NULL,

        jobid           INTEGER NOT NULL,

        message         VARCHAR(255) NOT NULL,

        funcid          INTEGER NOT NULL DEFAULT 0

);

CREATE INDEX error_idx_1 ON error (funcid, error_time);

CREATE INDEX error_idx_2 ON error (error_time);

CREATE INDEX error_idx_3 ON error (jobid);


CREATE TABLE exitstatus (

        jobid           INTEGER PRIMARY KEY,

        funcid          INTEGER NOT NULL DEFAULT 0,

        status          SMALLINT UNSIGNED,

        completion_time INTEGER UNSIGNED,

        delete_after    INTEGER UNSIGNED

);

CREATE INDEX exitstatus_idx_1 ON exitstatus (funcid);

CREATE INDEX exitstatus_idx_2 ON exitstatus (delete_after);
あとはコレを
# sqlite3 the_schwartz < theschwartz_schema.sql
としてDBファイルを作る。
#!/usr/bin/env perl

package MyWorker;

use strict;

use utf8;

use warnings;

use base qw( TheSchwartz::Worker );

use Data::Dumper;


binmode STDERR, ":encoding(cp932)" if $^O eq "MSWin32";


sub work {

    my ($class, $job) = @_;

    warn "お仕事ですよ! @{[ Dumper($job->arg) ]}\n";

    $job->completed();

}


package main;

use strict;

use warnings;

use TheSchwartz;


my $client = TheSchwartz->new(

    databases => [ +{ dsn => 'dbi:SQLite:the_schwartz' } ]

);

$client->can_do('MyWorker');

$client->work();
さらにクライアントのコード
#!/usr/bin/env perl

use strict;

use warnings;

use TheSchwartz;


my $client = TheSchwartz->new(

    databases => [ +{ dsn => 'dbi:SQLite:the_schwartz' } ]

);

$client->insert('MyWorker' => +{ hoge => "fuga" });
実行すると
お仕事ですよ! $VAR1 = {

          'hoge' => 'fuga'

        };
という風にサーバ側で表示されます。
ちなみに、DBD::SQLiteのバグで
closing dbh with active statement handles at .../Data/ObjectDriver/Driver/DBI.pm line 566.
という表示が出る様ならばココにある"issue-17603.tar.gz"のパッチを当てるといいです。どうやらこのバグ、デグレっぽいですね。
let X = "ひだまり"

let _ = "スケッチ"


try

  X / _ / X < また見て下さいね

catch /^Vim\%((\a\+)\)\=:E488/

  echo eval(

    \  substitute(

    \    substitute(

    \      v:exception,

    \      '^.*E\(\d\+\).*:\s*\(\(.\) / \(.\).*\). <\(.*\)$',

    \      '\2"\3".(\1-123)."\5"', ''), '/', '.', 'g'))

endtry
#!/usr/bin/env python

# -*- coding: utf-8 -*-


class X:

  def __init__(self):

    self.s = "ひだまり"


  def __lt__(self, v):

    print "%s %s" % (self.s, v)

    return self


  def __div__(self, v):

    if isinstance(v, int):

      self.s += "スケッチ"

    else:

      self.s += "365"

    return self


X = X()

_ = 1


X / _ / X < "来週も見てくださいね!"
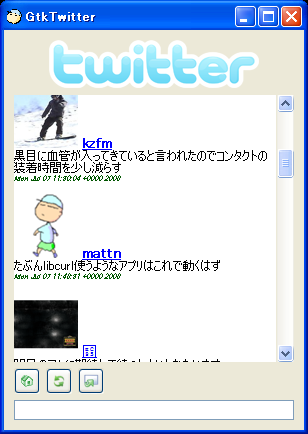
ごめんなさい。それが何かしらない...orz動かすには、環境変数「HTTP_PROXY」に「localhost:9277」を設定してgtktwitterを起動すればok。ただtwitterの設定が残ってるだろうから、UN*Xならば「~/.config/gtktwitter/config」を、Windowsならば「~/Application Data/gtktwitter/config」を修正して起動して下さい。同じアカウント名使ってるならばそのままでも動くかも。
このブログを応援する