2008/06/02


これ、すごいっす。
The Memcache API - Google App Engine - Google Code

High performance scalable web applications often use a distributed in-memory data cache in front of or in place of robust persistent storage for some tasks. Google App Engine includes a memory cache service for this purpose.

http://code.google.com/appengine/docs/memcache/
何が凄いって仕様が凄い。
通常のset/getの他、dictとして格納出来るset_multi/get_multiもある。Tagtterの様にタグ毎にキャッシュしたい場合には持って来いなAPIです。
どうやらdangaをベースにしている様で、LiveJournalsourceforge、さらにはWikiPediaでも使われているライブラリらしいです。

さて、今日Tagtterにこのmemcache APIを使ってみました。
使い方としてはページをそのまま!Tagtterの場合、動的なコンテンツと言えばタグ、Vote、ユーザですが、これらが変更されない限りトップページタグページは変る事は無いのです。他の情報はjavascript(jQuery)で動的に取得しており、サーバには格納されていません。
どんなに大胆な使い方かと言うと
class TopPage(webapp.RequestHandler):
  def get(self):
    cache = memcache.get('tagtter_top_page')
    if cache:
      # キャッシュがあるならそのまま出力
      self.response.out.write(cache)
      return

    ・・・ 巨大なデータ処理 ・・・

    path = os.path.join(os.path.dirname(__file__), get_template(self))
    cache = template.render(path, template_values)
    # キャッシュに溜め込む
    memcache.set('tagtter_top_page', cache, cache_time)
    self.response.out.write(cache)

class AddTagsAPI(webapp.RequestHandler):
  def get(self, username):

    ・・・ タグの追加処理 ・・・

    # 結果を出力
    dump_json(self, { 'status': 'ok', 'message': 'done' })
    # キャッシュをクリアしてやる
    memcache.flush_all()
上記の様に、キャッシュがあればそのまま出力し、タグが追加されればキャッシュをクリアするという方法。
おかげでトップページタグページの表示速度が激変しました。
但し、ユーザ一覧ページ等は、pageというパラメータにより出力する内容が異なる為、このままでは対応出来ません。やっちゃうとどんどん同じページが表示されてしまいます。
今のところ、トップページとタグページにしか取り入れていませんが今後少しずつ取り入れて行きたいと思います。

ところで、公開されたAPIのもう一つImages APIも使ってみました。
使い方は簡単。
from google.appengine.api import images

...

image = images.Image(data) # input data
image.resize(100, 100)
image.rotate(90)
data = image.execute_transforms(output_encoding=images.JPEG)
現状、合成したり90度単位でない回転等は出来ませんが、コレ使えばなんでもありちゃんかいっと思った。いずれやる。

動いている物は以下
Image API Test
Posted at by


以前、MOONGIFTさん所で見付けた「Growl for Windows」を試してみた。
Growl for Windows
Features currently supported:
  • Fully compatible with original Growl for Mac
  • API for local and network applications
  • Notification forwarding
  • Experimental support for WebKit-based display styles
http://www.tripthevortex.com/growl/
まず、Growl本家からtarボールを持ってくる(SDKはdmgなので...)
Growl Developer Downloads

Information regarding the SVN repository and other areas of interest are addressed in the developer documentation. Growl requires Xcode 2.3 to compile, which is available for free from Apple.

Growl 1.1 Source
http://growl.info/downloads_developers.php
次に、"/Growl-1.1-source/Bindings/python"に移動し以下のパッチを当てる。
--- Growl.py.orig   Wed Jan 24 05:36:17 2007
+++ Growl.py    Fri May 30 11:22:18 2008
@@ -72,7 +72,7 @@
         if userInfo.has_key(GROWL_NOTIFICATION_STICKY):
             sticky = userInfo[GROWL_NOTIFICATION_STICKY]
         else:
-            priority = False
+            sticky = False
         data = self.encodeNotify(userInfo[GROWL_APP_NAME],
                                  userInfo[GROWL_NOTIFICATION_NAME],
                                  userInfo[GROWL_NOTIFICATION_TITLE],
おそらく開発者のtypoかと思う。
そして"python setup.py install"する。
気持ち悪い人は"python setup.py bdist_wininst"する

後はサンプルコード
Objective-Cのモジュールをインストールしていないので、netgrowl経由でしか送信出来ないです。
#!/usr/bin/python
import Growl
g = Growl.GrowlNotifier(
    applicationName='GrowlExample',
    notifications=["PyGrowl"],
    defaultNotifications=[0],
    hostname="localhost",
    password="My Really Secure Password")
g.register()
g.notify(
    noteType="PyGrowl",
    title='wanings',
    description='toilet spilled some xxx!',
    sticky=False)
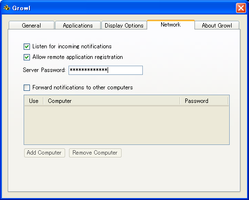
まずGrowl for WindowsをインストールするとシステムトレイにGrowlというアイコンができ、「Settings」を選ぶと設定画面が表示されます。次にNetworkタブを開き
  • Listen for incoming notifications
  • Allow remote application registration
にチェックを入れます。そして"Server Password"に上記ソースにあるpassword、"My Really Secure Password"を入れます。(実際はソースも設定も変更して使用しましょう)
growl settings 1

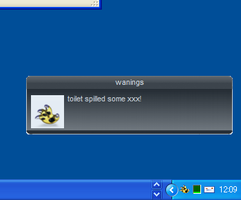
後は上記サンプルプログラムを起動すると以下の様にGrowlが表示されます。
growl notify
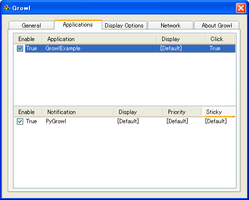
なお、設定の"Applications"にて挙動を変えられますで色々試してみてもいいかもしれません。
growl settings 1
また、上記ではpythonの例を示しましたがperlで"Net::Growl"を使い use strict;
use warnings;
use Net::Growl;
register(host => 'localhost',
         application=>"growl.pl",
         password=>'My Really Secure Password', );
notify(
       application=>"growl.pl",
       title=>'warning',
       description=>'toilet spilled some xxx more!',
       priority=>2,
       sticky=>False,
);
この様なサンプルでもGrowlは表示されます。
ちなみ、Growl for Windowsのせいなのか幾らかの日本語で文字化けが発生しました。
registerしたアプリケーションを消すには %USERPFOFILE%¥Local Settings¥Application Data¥Vortex¥Vortex.Growl.WindowsClient のディレクトリを一斉に消すと設定が消えてくれます。
個別で消す方法は見つかりませんでした。

色々な言語でBindingされている様なので皆さん試してみてはどうでしょうか
Posted at by


2008/05/30


追記
最新のWeb::Scraperでは"Web::Scraper::user_agent"でユーザエージェントが変更出来る様になっています。

昨日書いたエントリ「WWW::MechanizeとXPathでtwitterのfriendsを全部取ってみる」のはてなブックマークでotsune氏から
「Web::Scraper/eg/twitter-friends.pl」
というコメントを貰いました。
ただ、この「Web::Scraper/eg/twitter-friends.pl」は、アンカーのrel属性でcontactとなっている物を並べており、私のようなfollowerが少ない人ならばいいのですが、多い人だと100人超えてしまいます。
結果、100人以上取得出来ない事になります。

以上、おしまい!...というのもアレなので...

無理やり感たっぷりですが、Web::Scraperを使ってみました。
ログインしないと、friendsが辿れないのでそこはWWW::Mechanizeに任せ、LWP::UserAgentを継承しているのを利用して、Web::Scraperの__uaを置き換えました。(ウホ!無理やり)
何か他に、キレイなやり方ないですかねぇ...

#!/usr/local/bin/perl

use warnings;
use strict;
use WWW::Mechanize;
use Web::Scraper;
use YAML;

my $username = 'your_username';
my $password = 'your_password';

my $m = WWW::Mechanize->new(timeout => 10);
$m->add_header('Accept-Encoding', 'identity');
$m->get('http://twitter.com/login');
$m->submit_form(
    form_number => 1,
    fields    => {
        username_or_email  => $username,
        password           => $password,
    },
    button    => 'commit',
);

undef &Web::Scraper::__ua;
*Web::Scraper::__ua = sub {
    $m;
};
my $twitter = scraper {
    process 'tr.vcard',
        'friends[]' => scraper {
            process 'td strong a', nick => 'TEXT';
            process 'td.thumb img', image => '@src';
            process 'td.thumb img', name => '@alt';
            process 'td strong a', description => '@title';
            process 'td.thumb a', url => '@href';
        };
    result 'friends';
};

my $num_page = 1;
while (1) {
    my $uri  = URI->new("http://twitter.com/friends/?page=$num_page");
    my $friends = $twitter->scrape($uri);
    %$friends or last;
    $num_page++;
    warn Dump $friends;
}
Posted at by