2008/07/25


これはいいね。
Google App Engine Blog: Some small updates!
We're happy to announce we've released some small updates to Google App Engine. Among the more significant changes:
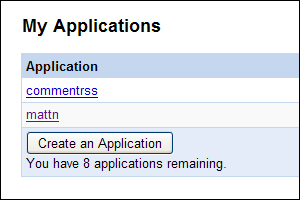
  • More apps: Want to create more than 3 applications with your App Engine account? Now you can now create up to 10!
  • Time windows for Dashboard graphs: Zoom in on the data in your dashboard to get a more accurate picture of whats going on. You can zoom in to see graphs for the last 24, 12, and 6 hour periods.
  • Logs export: You can now use appcfg.py to download your application's logs in plaintext format. Use appcfg.py --help for more information on how to download your logs.
  • Send email as logged in user: If you're using the users API, you can now send email from the email address of the currently-logged-in user.
最新版のダウンロードはこちらから。
作れるアプリ数が10個に増え
あと8個
ダッシュボードのデータ時系列が拡大できる様になって
6時間単位で拡大可能
appcfg.pyでログがエクスポート出来る様になって # appcfg.py request_logs <directory> <output_file> 現在ログイン中のユーザのメールアドレスが得られる様になったらしい。

やるね。Google App Engine。
Posted at by


2008/07/24


とは言ってもUser Agent Switcherが必要なのですが...

使い方は
:ua MyUserAgent
でUser Agent Switcherに"MyUserAgent"という名前で登録されたUser Agentに変更します。
:ua Default
でリセット :ua!
で設定ダイアログ表示となります。
急遽モバイルページに行きたいけどメニューに手を伸ばすの面倒臭いって方には使えるかも。
ちなみに私はデフォルトで登録されていた物の他に、DoCoMo、Vodafone、SoftBank、Hatenaクローラ等のUserAgentを登録してます。
uaSwitch.js
よろしければどーぞ。
Posted at by


2008/07/23


遅ればせながらGoogle Protocol Buffersで遊んでみました。
protobuf - Google Code
Protocol Buffers are a way of encoding structured data in an efficient yet extensible format. Google uses Protocol Buffers for almost all of its internal RPC protocols and file formats.
まず、インストールは以下の様に行いました。なおprotobufを展開したフォルダは以下のフォルダ。 C:¥temp¥protobuf-2.0.0beta¥

cpp版のインストール

展開したフォルダのvsprojectsフォルダにある"protobuf.sln"をVisual Studioで開きReleaseビルド。
必要であれば環境変数PATHの通る場所へ"protoc.exe"、"libprotobuf.dll"、"libprotoc.dll"を置く。また"libprotobuf.lib"と"libprotoc.lib"はコンパイル時に必要になるので分かりやすい位置に置いておく。

java版のインストール

まずApache MavenをインストールしPATHを通す。
次にjavaフォルダへ移動し C:¥temp¥protobuf-2.0.0beta¥java> mvn test install
とすれば必要なライブラリがダウンロードされ、テスト後インストールされる。
targetフォルダに"protobuf-java-2.0.0beta.jar"が出来るのでこれまた分かりやすい位置に置く。

python版のインストール

pythonフォルダに移動し、cpp版をビルドした際に出来上がった"protoc.exe"にパスが通っている事を確認して C:¥temp¥protobuf-2.0.0beta¥python> python setup.py bdist_wininst
...
C:¥temp¥protobuf-2.0.0beta¥python> cd dist
C:¥temp¥protobuf-2.0.0beta¥python¥dist> protobuf-2.0.0beta.win32.exe
※Windowsじゃない人は"bdist_wininst"の代わりに"bdist_rpm"とか"install"とか...

テストコードによる検証

まずデータ定義となるprotoファイルを作る。詳しい説明は省略するが知りたい人はココとかココとか。今回は名前と年齢を格納出来るPersonクラスを扱う。
person.proto
package protocol;

message Person {
  required string name = 1;
  required int32  age  = 2;
}

このファイルを指定して、スタブクラスを生成する。
まずcpp版。 C:¥temp¥protobuf-2.0.0beta¥tmp> protoc --cpp_out=. person.proto
これで"person.pb.cc"と"person.pb.h"が生成される。以下テストコード。
test.cpp
#include <iostream>
#include <fstream>
#include <person.pb.h>

void save(const char* fn) {
    protocol::Person person;

    person.set_name("mattn");
    person.set_age(18);

    std::ofstream ofs(fn);
    person.SerializeToOstream(&ofs);
    ofs.close();
}

void load(const char* fn) {
    protocol::Person person;

    std::ifstream ifs(fn);
    person.ParseFromIstream(&ifs);

    std::cout <<
        "name:" << person.name() <<
        ",age:" << person.age() << std::endl;
}

int main(int argc, char* argv[]) {
    if (argc != 2) return -1;

    save(argv[1]);
    load(argv[1]);

    return 0;
}
ビルドは以下の手順で行う。 C:¥temp¥protobuf-2.0.0beta¥tmp> cl -I../src -I. /EHsc test.cpp person.pb.cc libprotoc.lib libprotobuf.lib
実行すると C:¥temp¥protobuf-2.0.0beta¥tmp> test person_cpp.txt
name:mattn,age:18
と表示される。そう...18歳です。ウソです。
生成される"person_cpp.txt"は以下の様なファイルとなる。

^Emattn^P#
次にjava版。"person.proto"というファイル名からPersonクラスを生成する際にファイル名がバッティングしてしまうので"persons.proto"という別名にコピーしておく。
C:¥temp¥protobuf-2.0.0beta¥tmp> protoc --java_out=. persons.proto
"protocol/Persons.java"が生成される。
テストコードは以下の通り。
test.java
import protocol.Persons;
import java.io.FileInputStream;
import java.io.FileOutputStream;

public class test {
    public static void main(String[] args) throws Exception {
        Persons.Person.Builder personBuilder = Persons.Person.newBuilder();
        Persons.Person mattn = personBuilder.setName("mattn").setAge(18).build();

        FileOutputStream fos = new FileOutputStream(args[0]);
        mattn.writeTo(fos);
        fos.close();

        FileInputStream fin = new FileInputStream(args[0]);
        mattn = Persons.Person.parseFrom(fin);
        fin.close();

        System.out.printf("name:%s,age:%d", mattn.getName(), mattn.getAge());
    }
}
ビルドは以下の手順で行う。 C:¥temp¥protobuf-2.0.0beta¥tmp> javac -classpath protobuf-java-2.0.0beta.jar; test.java
実行結果はcpp版と同様。

最後にpython版。
C:¥temp¥protobuf-2.0.0beta¥tmp> protoc --python_out=. person.proto
"person_pb2.py"が生成される。以下テストコード
test.py
import sys
from person_pb2 import Person

fn = sys.argv[1]

person = Person()
person.name = "mattn"
person.age = 18
open(fn, "w").write(person.SerializeToString())

person = Person()
person.ParseFromString(open(fn).read())
print "name:%s,age:%d" % (person.name, person.age)
実行結果はcpp版、java版と同様。

所感

結局の所、"protocol buffers"とは、"Serialize Format"生成ツールおよびライブラリと、"Serializable"なクラス郡と言った所だろうか。
実際にはRPC等で転送してみないと良さは分からないかもしれないけど、XMLの様に自信がValidation可能な物ではなさそうなので転送の際には外側からデータのサイズ送信やチェックサム実施も必要になるかもしれない。
そういった意味では、「【ハウツー】XMLはもう不要!? Google製シリアライズツール「Protocol Buffer」 (2) ダウンロードとインストール | エンタープライズ | マイコミジャーナル」の"XMLはもう不要!?"には少し疑問を感じる。

時間があれば、ネットワーク上にシリアライズしたデータを転送してみたいと思う。
Posted at by